step 3 / Position your patch piece onto the center of your main front piece, and pin it into place. Topstitch 1/8″ from the outer edge of your patch to secure it to your pillow front, as shown.
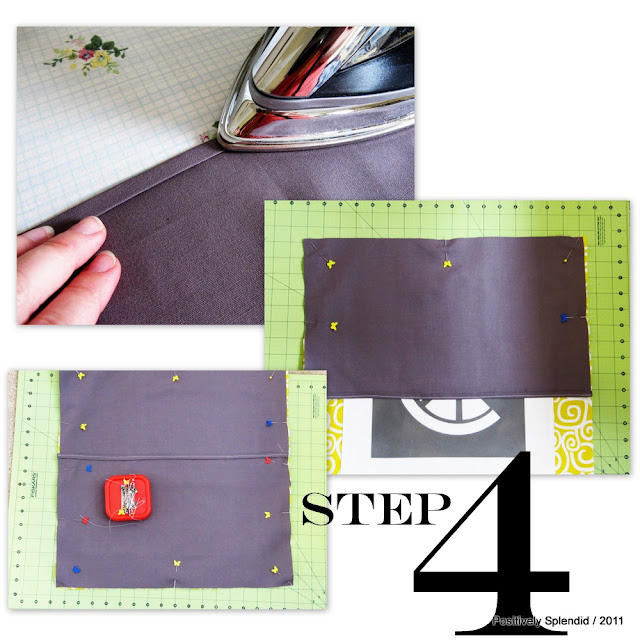
step 4 / Fold one of the long edges of your rectangular pieces down 1/4″; press. Fold under another 1/4″, and press again. Stitch to secure this hemmed edge. Repeat with your other rectangle piece. With your completed pillow front face up on your work surface, lay one of your rectangle pieces on top, right sides facing, so that the corners and edges are all aligned and the hem you just sewed runs through the center of your front piece. Pin. Now, position your other rectangle piece one the bottom portion of your pillow front piece in a similar manner. Pin. Note: The hemmed edges of your rectangle will overlap by a few inches at the center of your pillow. Using a 1/4″ seam, stitch all the way around the outer perimeter of your pinned pieces. Clip your corners and turn your pillow cover right-side out.

Having grown up in a home brimming with sewing notions and paintbrushes, Amy has a deep love for all things creative. On any given day, you’ll find her knee-deep in her latest creative endeavor, with projects ranging from sewing and crafts to home decor and kid-friendly ideas. Amy believes that everyone, regardless of skill level or experience, possesses the ability to create something beautiful, and Positively Splendid was born of her passion for helping others harness their innate creative potential.


ADORABLE Amy! What a fun way to start out the series!
GORGEOUS! I am super excited about this series! YEA 🙂 Thanks so much for the inspiration!
~robin
So cute! I love the fabrics that you used and that lemon slice is too adorable!
I love how crisp and clean the look is!
I love it! Those look wonderful! Perfect for the warmer months that are coming!!
Super, super cute! I love how these turned out and thank you for the tutorial!
oh my these are SO cute! Perfect for summer!!
Great graphics! Fun!
Nice!
I found you from Tip Junkie. I absolutely <3 these pillows! Great job
Okay I’m so in love with this idea. Great job!
Jeanna @ dramaqueenseams.blogspot.com
Absolutely adorable, Amy! You are so good at tutorials. 🙂 Love the font you used for the wording! Visiting from A 2 Z. 🙂
ok 1st, I LOVE your pillows! they would be perfect for my patio, and 2nd, I LOVE your blog. I’m glad I found it. saw you on tip junkie.
new follower!
kathryn
http://www.thedragonsfairytail.blogspot.com
Amy!! I love these. They turned out so cute – so cute that I am featuring them on my blog tomorrow!
I love your pillows, but I have question about the settings you use for cutting freezer paper on the silhouette. I tried, but it kept tearing. So can you tell me the speed, thickness, and blade?
Thanks!
Les
[email protected]
Amazing, Amazing!!! Love them Amy!!!
I shared them on my TT&J facebook page 🙂
xoxo
Jen
Just adorable! I’m a new subscriber and honestly you have so many great things going on in your page I was trying to debate where to click next! Thank you!
another adorable idea!
Love this project. Can I link it back to my blog?