Supplies:
Once you’ve completed the steps above, insert your finished vignette into your open frame. (Meaning: leave the glass out!) Part of the charm of this project is the dimension of the various layers, and you don’t want to obscure that with a boring ol’ piece of glass.
- If you are doing a grouping of silhouettes as I have done here, I recommend creating and saving each individual silhouette as a jpeg, then copying each of those images into a new blank document to create your grouping to print out. That way, if you want to go back later down the road and work with each silhouette individually, you’ll be able to do so without any hassle.
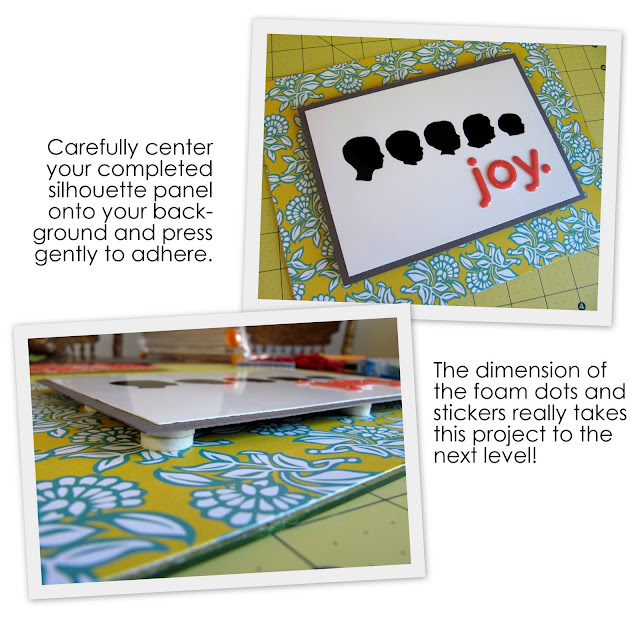
- It is my own personal preference to add extra dimension by stacking the foam dots in two’s, but you can most certainly use just one dot in each space if you would like.
- To add stability to your finished project, I recommend adhering your finished vignette to the frame’s glass before framing. If you want to use the frame for another purpose later down the road, you won’t kick yourself for having thrown it out. 😉
I’ll be sharing this at these marvelous parties!

Having grown up in a home brimming with sewing notions and paintbrushes, Amy has a deep love for all things creative. On any given day, you’ll find her knee-deep in her latest creative endeavor, with projects ranging from sewing and crafts to home decor and kid-friendly ideas. Amy believes that everyone, regardless of skill level or experience, possesses the ability to create something beautiful, and Positively Splendid was born of her passion for helping others harness their innate creative potential.


WOW that is really really beautiful! Will try to play with photoshop for sure. Thank you for sharing this.
Stopping by from SITS & following you now 😉
Thank you for the wonderful idea! Sadly, I am the one who will be running with my hair on fire to the the nearest post office this year! But now at least I have an idea!
I love this idea! Thanks for sharing! I am visiting via TTA and am now a follwer! Have a great aternoon!
stopping by from blue cricket design! love this idea! and i love the colors too! i’ll def be doing a silhouette project soon 🙂 thanks for sharing
What a thoughtful gift! I have been thinking about your silhouette tutorial and am trying to decide which wall to redecorate. Thanks for another idea!!
Um– love love love this! I am a silhouette junkie. Thanks for the tutorial
I love these silhouettes! I can’t wait to try these with my grandchildren!
Thanks for following me.
If you like to blog hop come to my blog and grab a button for Welcome Wednesday. It is a great way to get your name out!
http://www.happyfamilyhappykids.blogspot.com
I LOVE this, now I have a new project! I wonder if I can add a silhouette of my dog!
Can I ask how you got the fonts for your titles on your blog also?
so artistic… really nice!
thanks for sharing!
Flory
This is adorable. I want to try it!
Ahhhh….your blog is fabulous! Newest follower here! Can’t wait to see more from you 🙂
stopping by from somewhat wimple’s linky. i love silhouettes!! these are perfection!
Love it! That is a neat trick about the dots to give it dimension. I would have never thought of that. That is why I love the Blog Community!!
Take care!
LOVE this so much I can barely stand it! The colors are great and I have a big soft spot for silhouettes! Gorgoues!
OK, I am blaming you that I didn’t get my housework done today 😉
Found your Photoshop tutorial for creating silhouettes a couple days ago and today I just HAD to try it. This is SO much fun. Thank you for putting this together!!
I am back: I just had to share your great idea on my blog, so I put a link to your blog on mine. Didn’t know if you would mind if I used a picture from your blog (if I gave you credit for it), so just to be safe I didn’t do it…
Love this! It turned out beautiful! 🙂
I’m back. I made my own version of these (not as cute as yours, but I tried!) and posted them on my blog with a link back to you. Thanks again for the great idea!
So cute…can’t wait to do this myself!
Hi Amy…may sound like a silly question but how did you get the detail such as highlashes and hair sticking out, etc.? I’ve already made some and was trying to get those details since my kiddos have extremely long lashes. Thanks for the tutorial and the info. I love it!
super cute I love it- now following your from csi
-Bree Modsblog.com
Great way to display silhouettes! love the idea!
Great project, beautiful outcome, love it!
I love everything about this project. Must. Learn. Photoshop.
I love it. Every single thing about it. Adore. If only Photoshop didn’t hate my guts! Some days we will become friends. Someday.
Hi! Your project is so great! I have been thinking of putting up a frame above our bed but I don’t want to have a glass on it. Your project gave me an idea! Thanks for sharing!
This is darling! I had to stop over when I saw your photo featured on Infarrantly Creative because you and I have the same name! I’m also Amy Bell 🙂 Happy 4th!
I love this, I am definitly going to give it a try. Thanks For sharing
Oh Gee…have I become so jaded that the “hair on fire” statement made me laugh so hard I sprayed my morning coffee across the table?
This is such an amazing project! Thanks for the excellent tutorial!
Jan
http://www.unique-baby-gear-ideas.com