The end result:
I still don’t fully trust this for breakable objects like plates, but for small, lightweight items like the wreath in my Valentine mantel…
***
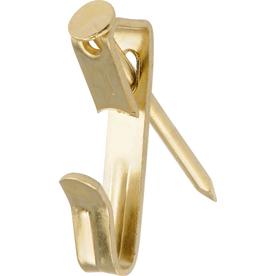
For each of the three categories above, I recommend using a traditional picture hanger like the one pictured below to mount the art on your wall (make sure it is rated for a weight to accommodate your art). These are very inexpensive, and can be found at Walmart, Target or any home improvement store. Why not just use a nail on its own? These hangers do wonders to protect your walls from unsightly damage, and the way they are anchored ensures they won’t eventually be pulled out of the wall by the weight of the artwork.
But what about situations when you want to hang a large, heavy object on a wall in a place where there is no stud to be found, and you know your drywall won’t be strong to enough to hold the piece on its own? I’ve got you covered there, too!

Having grown up in a home brimming with sewing notions and paintbrushes, Amy has a deep love for all things creative. On any given day, you’ll find her knee-deep in her latest creative endeavor, with projects ranging from sewing and crafts to home decor and kid-friendly ideas. Amy believes that everyone, regardless of skill level or experience, possesses the ability to create something beautiful, and Positively Splendid was born of her passion for helping others harness their innate creative potential.


Terrific Tips! Many Thanks for Sharing 🙂
A few months ago I hung an entire wall of plates (antique included) with paper clips and hot glue.
They’re still hangin’ yeah, yeah, yeah!
Here’s the how to:
http://decortoadore.blogspot.com/2012/01/how-to-create-wall-of-plates.html
Job well done! Who needs a man? I need that framed chalkboard for my craft room!
thanks for sharing your tips!
here’s one that works really well if the item is light weight and not breakable – i use real heavy cardboard that comes with packs of paper. i cut it into 1”x1 1/2” rectangles & then bend the bottom 1/2” of the 1 1/2” side. theni punch a hole into the top 1/2” of the 1 1/2” side.
i mod podge it onto the back trying to only glue the part that had the “fold”. you gotta be a good eye-baller to get it into the middle & on straight, but – boy, oh boy, does it work great! & the cost? free!
here’s a link to a photo of what it looks like http://randeeparker.blogspot.com/2010/06/mod-podged-plaques-by-hundreds.html (go toward the bottom).
Thanks for posting this! We’ve had some problems with this, so it’s great timing for me!
Hello from a new follower!
Do you have good tips for hanging art on plaster walls? We rent our house and don’t want to put big chips and holes in the walls. It kills me because I am an artist and all of my paintings have been sitting in a corner for 4 years! Grrr.
809446 337990never saw a site like this, relaly impressed. compared to other blogs with this write-up this was definatly the most effective web site. will save. 729428