In my opinion, it’s the little touches that take a sewing project from ho-hum to fabulous, and there are few things that can accomplish that effect quite as dynamically as adding piping, and especially custom piping made to match your project to a tee.
Just recently I used piping in the bumpers I made for George’s nursery bedding set…
…and in my Vintage Photo Pillows.
When it comes to children’s garments, no one uses piping quite as well as my friend Lindsay from The Cottage Home. See that custom-made piping detail at the collar of this adorable dress? Impeccable!
Not long ago, I was completely intimidated by the thought of using piping. I didn’t know how to insert it, much less make it myself. After a bit of practice, though, I found working with piping is not only very straightforward – it’s downright fun!
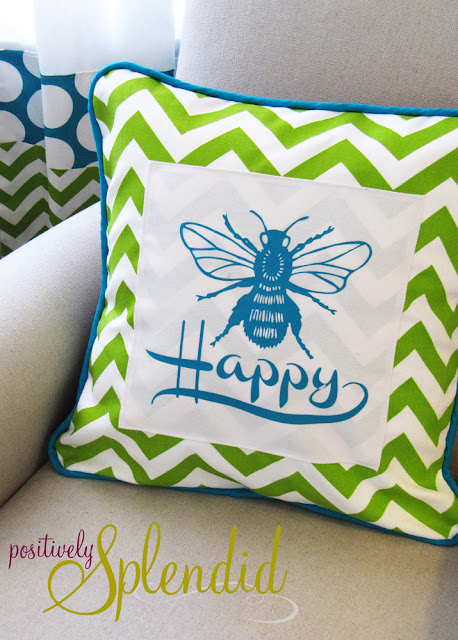
Today, I’m going to share with you how to make and insert your own custom piping by demonstrating how I did so to make this Bee Happy Pillow to match the nursery decor. A pillow is a terrific beginner project to hone your piping skills!
Note: The basic construction of this pillow is identical to the process I used for my Freshly Squeezed Pillow Set last spring, with a few exceptions:
- Instead of using freezer paper stenciling for the front patch, I created a bee design using my Silhouette machine and their heat transfer material.
- I rounded off the outer corners of my front and back pieces to make inserting the piping easier.
- I inserted piping before sewing my front and back layers together.
Let’s get started!
For this project, you will need:
Fabric for the main pillow front (I used a chartreuse chevron to match the nursery decor): cut one piece to 16 x 16 inches
Fabric for the front patch (I used white twill): cut one piece to 10.5 x 10.5 inches
Fabric for the back panels (I used grey twill): cut two pieces to 16 x 11 inches
(1) 16-inch pillow form
Silhouette machine and heat transfer material (I purchased a bee design from their online store)
Silhouette machine and heat transfer material (I purchased a bee design from their online store)
70 inches ready-made or custom 1/4-inch piping (see instructions/supplies below for the custom version)
Part I: Making your piping
Supplies:
1/4″ cotton cording
Fabric for your piping
Coordinating thread
Rotary Cutter and Mat
Zipper Foot
Seam ripper
Basic sewing supplies: machine, shears, etc.
Seam ripper
Basic sewing supplies: machine, shears, etc.
To begin, measure and cut a 70-inch length of cording. How did I arrive at this 70-inch measurement?
The rule of thumb for how much piping you’ll need for a project is to have a length of piping equal to the fabric length.
Since our pillow has (4) 16-inch sides, we will need enough piping to run along each side (16 x 4), plus a few inches (6 inches, in this case) of wiggle room.
So, we’ll need (16 x 4) + 6 = 70 inches of piping.
Now, you will need to make a 70-inch bias strip that is 1.5-inches wide. Why 1.5 inches?
The width of your bias strip is calculated by doubling both the width of your cording and the width of your seam allowance and then adding both of these numbers together.
Our piping is .25″ and we’ll be using .5″ seam allowances. So, our bias strips will need to be:
(.25″ x 2) + (.5″ x 2) = 1.5″
For a terrific how-to for cutting bias strips, I recommend checking out step one of this tutorial from Prudent Baby. This ingenious method allows you to make an abundance of bias strips in half the time it would take using the typical method. It has revolutionized my sewing life!
Now that you have two equal lengths of cording and bias strip, let’s make some piping.
Place your bias strip face down on your work surface. Center your cording piece lengthwise on top of your bias strip, and then fold your bias strip in half (like a taco) around your cording, lining up the raw edges of the fabric. At this point, you can pin everything to prevent everything from shifting as you stitch, but I’ll be honest: I never do!
Now, allow me to introduce you to your new best friend:
Hello, my name is Zipper Foot!
A zipper foot is a must when making and inserting piping. It allows you to stitch very closely to your cording, resulting in a clean, polished look for your project.
Head to your machine, which is outfitted with your zipper foot. Stitch to close your bias strip around your cording, stitching very closely to the cording as you go. The zipper foot will make this easy to do!
Hooray! You now have a lovely length of custom piping! Wasn’t that easy?
Now that your piping is finished, let’s use it to make our pillow!
Part II: Preparing Your Pillow Pieces
Note: For a full pictorial tutorial detailing the following bulleted steps, refer to steps 2 through 4 in the tutorial for my Freshly Squeezed Pillows.
- Apply your heat transfer bee design to your front patch piece (the 10.5-inch square) according to the heat transfer package directions. Fold under each of the raw edges of this patch piece 1/4″; press.
- Center the patch face up on top of your front panel piece and pin into place. Edgestitch to secure your patch to the front piece.
- Fold under one long edge of one of your back panels 1/4″; press. Fold the same edge under another 1/4″; press. (You are creating a narrow hem.) Stitch along this hem to secure it. Repeat with your other back panel piece.
- Using a round object as a template (a roll of ribbon works well), round off all four corners of front panel piece and the two corners at the unstitched sides of each of your back pieces.
Part III: Attaching Your Piping and Finishing Your Pillow
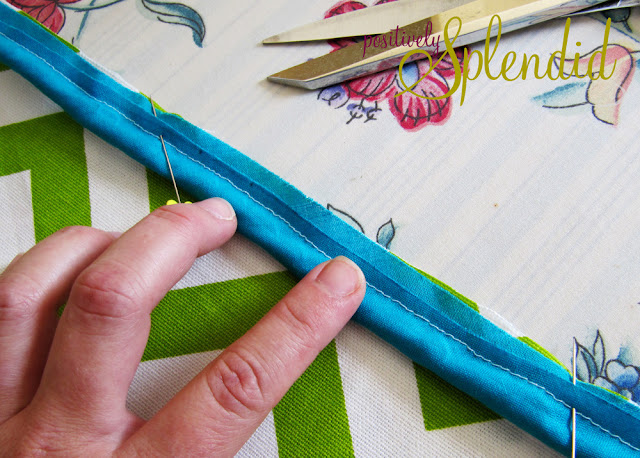
Now, pin your piping to the right side of your front panel piece, aligning the raw edges of your front panel with the raw edge of your piping. Pin into place as you work.
When you reach one of the rounded corners, shape your piping around the curve, cutting notches so it lays nice and flat, as shown.
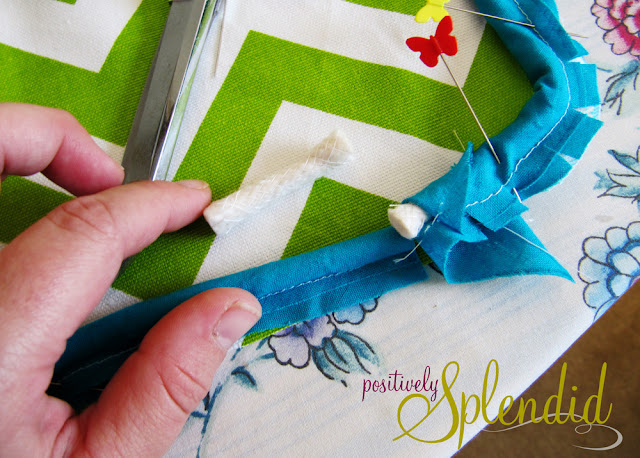
When you have pinned all the way around your pillow and are back to your starting point, use your seam ripper to open up the unpinned end of your bias strip to expose your cording inside.
Trim your cording end so that it meets up precisely with the cording at the beginning of your piping piece.
Fold under the edge of your bias strip by about 1/2″, and then wrap this end around the beginning of your piping strip, so that the raw edge of your piping is enclosed completely, as shown. Pin this into place.
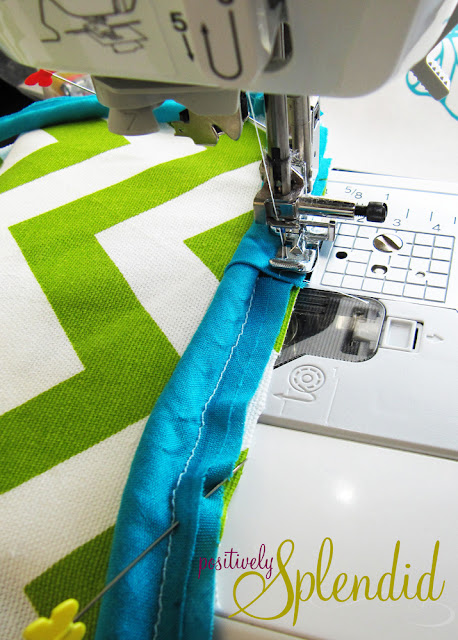
Now, stitch your piping into place using your zipper foot, stitching just a little bit to the right of the stitching you used to create your piping. Be sure to remove all of the pins as you stitch!
Here the piping is all stitched into place.
With your completed pillow front face up on your work surface, lay one of your back panel pieces on top, right sides facing, so that the rounded corners and edges are all aligned and the hem on your rectangle piece runs through the center of your front piece. Pin. Now, position your other back panel piece on the bottom portion of your pillow front piece in a similar manner. Pin. Note: The hemmed edges of your rectangle will overlap by a few inches at the center of your pillow.
(For photos of this step, refer to step 4 in my Freshly Squeezed Pillow tutorial.)
Using your zipper foot, stitch all the way around your pinned pieces with a 1/2″ seam allowance, stitching as closely as you possibly can to the cording as you go. You won’t be able to see the actual piping as you work, but you will be able to feel it and see the outline of the cording as you sew.
Note: There is a type of foot available called a piping foot made specifically for this step. It has a groove at the bottom that goes over the piping as you stitch, ensuring your stitching is done properly as you go. If you happen to have one of these, use it here. I actually own one, but I opted to use a zipper foot for this project since that is one that far more people are likely to have in their arsenal of sewing supplies.
Finish your seam either with a serger or a zigzag stitch on your regular machine. Turn your pillow cover right-side out and slip your pillow form inside. You are finished!
Doesn’t that piped edge look sharp? So professional!

Having grown up in a home brimming with sewing notions and paintbrushes, Amy has a deep love for all things creative. On any given day, you’ll find her knee-deep in her latest creative endeavor, with projects ranging from sewing and crafts to home decor and kid-friendly ideas. Amy believes that everyone, regardless of skill level or experience, possesses the ability to create something beautiful, and Positively Splendid was born of her passion for helping others harness their innate creative potential.


That pillow is one of the cutest things I’ve seen i along time. And you know my thoughts on piping – LOVE. Great tutorial!
Thanks for making it seem less scary 🙂
Love, love, love the pillow you made. It’s so bright and cheery.
Great tutorial! I never would have guessed it was that easy! Love, love, love, your nursery, by the way!
I have been wanting to make piped trimmed pillows but piping scares me. You made it look easy!! Thanks for the tutorial. I’ll give it a try now.
Love the Bee pillow!!
Love the Bee happy pillow – it is super cute and sunshiney!
Thanks so much for this tutorial – I’ve been dying to try and tackle piping on a pillow but so far have only managed enough guts to buy the piping!
Thank you for such a good tutorial. I have never used piping but now I know what to do with it.
P.S. Your pillows look awesome I love the bright colours!!
Positively Adorable!! Great tutorial – I have yet to master piping but with your help…maybe! Thanks so much… AJ@queenofmynest
What a wonderful tutorial ~ I pinned it so I could find it when I need it and to share…just wonderful!
Have a joy-filled day, mb
Great tutorial. It helped to have such fun bright colors and clear photos! I must check out the piping foot. I like your zipper foot; much wider than mine.
Amy I LOOOOOVE this pillow. So I may be a little biased b/c of my love for bees but this is adorable. It would be so awesome for the Queen Bee Market at SNAP! 😉
That turned out great. Thanks for the awesome tutorial! I would love for you to link up at Handmade 52! http://raisingoranges.blogspot.com/2012/01/handmade-52-3.html
Thank you so much for such a great tutorial, I have never used piping before (it scared me LOL) but now I have seen how to do it, I am going to give it a go. Thanks you. Your pillow is beautiful, love the colours you used.
You were featured today at Grits and Giggles. This pillow is wonderful!
http://www.gritsandgiggles.blogspot.com/2012/01/what-i-love-wednesday_25.html
Thanks for the piping tutorial. Love the “Bee” Happy fabric. 🙂
Oh wow! This is really so good and your tutorial so clear! Thank you! I am off to do some piping!
Have fun! Piping really adds such a nice finishing touch, and it is so easy to do!
Bee-eautiful 🙂 I would love to make a pillow with this bee design. Would you share a link to where you can get the image? Thank you!
Hi Amy,
I stumbled upon your site when I did a search on sewing pillow covers with cording. I purchased premade cording for some throw pillows but I have only done basic sewing and have never used a zipper foot. Could this be done without a zipper foot? I assume not since it helps get the stitch close to the cording. Any feedback would be appreciated.
Thank you,
Kim ~
Hi, Kim! In order to do this project, a zipper foot really is key. Don’t be intimidated, though; it really isn’t difficult to use!
That’s what I figured so I ordered one after reading your article. In fact, I just received it in the mail! I will let you know how it goes since I now know what I will be working on this coming weekend!