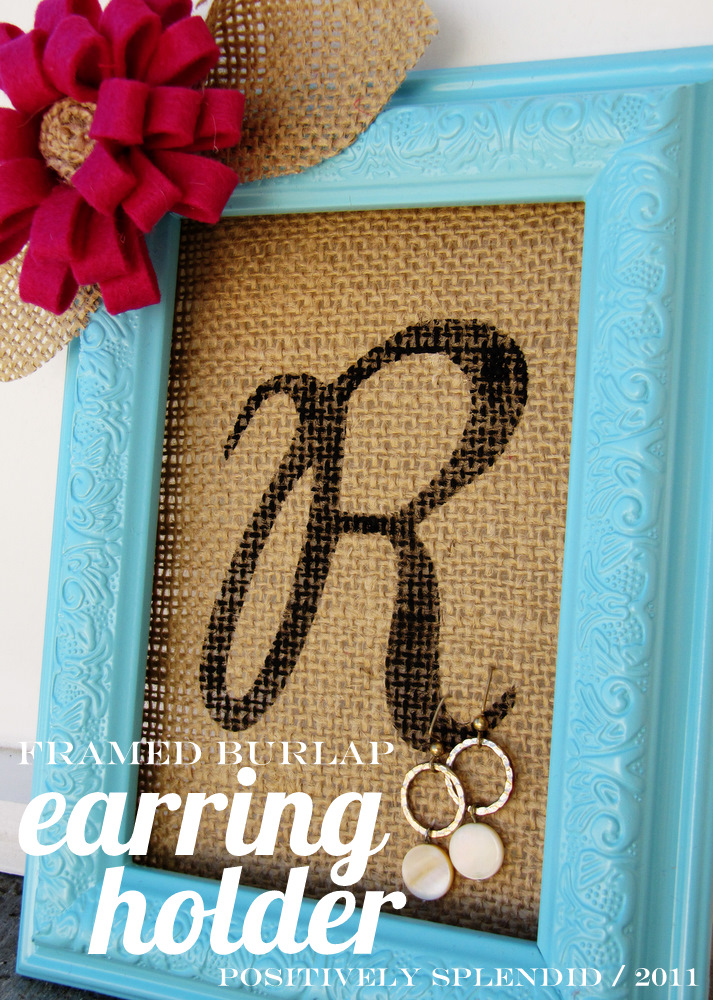
There is nothing like having a gift-worthy project in your creative arsenal that can be whipped up in no time. I love this Framed Burlap Earring Holder as much for its attractiveness as I do for its functionality and ease of assembly. This is a project you will return to again and again for birthdays and holidays alike!
I had a couple of extra Burlap and Felt Flowers remaining after my brooch project from earlier this week, so I opted to use one of those here. You could always use a purchased flower embellishment for added convenience, though!
For this project, you will need…
An empty frame, glass and backing piece removed
A piece of burlap, just larger than your frame
Spray starch (optional, but recommended)
Staple gun
Die cutting machine
Freezer paper
Acrylic paint and foam brush
A fabric flower, to embellish
(I used one of my Burlap and Felt Flowers)
Additional burlap, for leaf embellishments
Hot glue gun
step 1 / Spray your piece of burlap generously with your spray starch, and iron the piece until it is dry. (This will give the burlap enough body to hold up to the weight of the earrings later on.) Cut a letter stencil from your freezer paper with your die cutting machine. Center the freezer paper onto your burlap piece, and iron it into place. Paint within the stencil with your acrylic paint and foam brush. Note: Use only the slightest amount of paint on your brush and dab gently to achieve an antiqued look. Allow the paint to dry completely before removing the freezer paper.

step 2 / Center your frame on top of your burlap piece, and trace around the perimeter of your frame. Trim away the excess burlap so that your burlap piece is precisely the same size as your frame. Use your staple gun to affix the burlap piece to the back of your frame, pulling the burlap piece tightly as you work.

step 3 / Cut two leaf shapes from your remaining burlap. Add a dab of hot glue to the bottom tip of each leaf and squeeze it together to shape your leaf. Hot glue your leaves to the top corner of your frame, and then glue your flower embellishment on top of your leaves.

All finished!
All that’s left now is to adorn your creation with your favorite earrings. What a pretty display!


Having grown up in a home brimming with sewing notions and paintbrushes, Amy has a deep love for all things creative. On any given day, you’ll find her knee-deep in her latest creative endeavor, with projects ranging from sewing and crafts to home decor and kid-friendly ideas. Amy believes that everyone, regardless of skill level or experience, possesses the ability to create something beautiful, and Positively Splendid was born of her passion for helping others harness their innate creative potential.
THANK YOU for this… I’m halfway through making a hairclip frame, and was thinking I could do with a frame for earrings, this will save me some time figuring out how best to do it!! LOVE the blue colour by the way =) x
Yet another ‘positively splendid’ project! Love the monogrammed earring holder and I am doing a feature this morning!
Denise
Extreme Personal Measures
Love it! I need to make my daughter a jewelry holder as she is almost a teen and accumulating lots of goodies for herself but doesn’t want a jewelry box. Gonna make her one of these!
Thanks for sharing!
loving this ~ I have a similar project on my radar, but love that you painted the initial on the burlap. Perfect touch!
I love this idea! You are so creative. I might just have to copy this one. Happy Friday!
Your never cease to amaze me with your creativity! I love your creation. It’s very pretty and very original.
Jessie
http://www.mixandchic.com
I Love the burlap idea! The idea is similar to my earring holder, but I love the elegance of your so much more 🙂
http://boutiqueginabeana.blogspot.com/2010/01/earring-holder-my-first-tutorial.html
This is fabulous! I love it! I need one of these.
I just awarded you the ‘One Lovely Blog Award’! Please hop over to my blog to claim your prize when you have a chance. 🙂
Have a fabulous weekend!
Jessie
http://www.mixandchic.com
Oh goodness! I just saw your link as a Creative Estates attendee over at Kim’s TCB! Why oh WHY did I not stumble across your before Creative Estates was over?! Your blog and style is SO super cute!! I’m totally doing this project for MYSELF..I’ve got all the pieces and a ton of earrings that need a home!! 🙂 Thank you!! 🙂
I love anything with burlap; this is so pretty! Hey I awarded you the One Lovely Blog Award this morning- stop by my blog to get it. 🙂
That is super, super cute! I love it! I have yet to try anything with this freezer paper stuff. This might be the one. 😉
This is so cute! I love the flower, it just makes the whole thing that much cuter!
This is awesome! I don’t like the look of traditional earring holders and think they tend to be too bulky, but this would be great on the wall. Thanks for this great tutorial!
Very cool!! I don’t wear earrings but if I did, this would be a great way to display ’em! 😉
I love this project. You gave fantastic step by steps and your attention to detail is great. My daughter would love this!
So Cute!! And a great gift ideas for teacher’s appriciation day!Thanks for sharing!!!
amy! that is so cute! I love the monogram and the color of the frame is perfect!
cute little embellishment of the flower really “makes” this piece.
gail
visiting from tip junkie
Saw this at Tip Junkie…I’d love for you to come link this up at my Tuesday Time Out Linky Party! The link is below!
Smiles,
Melanie
Reasons To Skip The Housework
Tuesday Time Out Link Up Party
Link up Your Weekly Parties Here
That came out really nice! Thanks for the how-to, I’ll be linking.
I love this project and the colors! so beautiful.
kathryn
http://www.thedragonsfairytail.blogspot.com
I love this! I featured it on my blog today. Thanks!
Lois
http://www.auntielolocrafts.blogspot.com
Thanks so much for posting this tutorial. I had a double frame I had found at Goodwill, so I used a monogram on one side and a quatrefoil design on the other. I posted a pic of my finished product and link to your tutorial on my blog.
so totally beautiful! I need to make this with my daughter.
Oi,
Adorei!!!
Bjos
Loveeddd this, so here is my version! Check it out!
http://everydaywiththejays.blogspot.com/2012/01/make-burlap-jewelry-holder.html
Thanks for the inspiration! I did this project and blogged about it here: http://prettyladydesigns.blogspot.com/2012/02/burlap-earrings-holder.html
It was super easy, not to mention FREE because I had everything on hand already. :o) Thanks!
Hi Amy! Thanks for this awesome project to use more of the felt and burlap flowers! I’m addicted to them! 🙂 I’m wondering if this is meant to be hung on the wall or placed on some kind of stand. I want to put mine on my dresser, but I’m not sure how to make it stand up. Do you have any suggestions? Thanks!!
I’ll be sure to try this at home over the weekend. I love doing DIY stuff.
buy earrings online
Card holder makes your office card graceful.
Gift Card printing
Scratch Cards
Plastic Business Cards
I normally don’t like burlap but this looks great. I’m definitely going to try this.
This comment has been removed by the author.
I love this idea!!! One question though. Where did you get that Awesome frame?
Where did you get your frame? Thanks so much!
So pretty!! I love this. I shared it in my round up today: http://www.vixenmade.com/2013/05/last-minute-mothers-day-gifts.html
Hi, what did you use to pin up the earrings?
The earring backs fit perfectly through the holes in the burlap. Thanks for stopping in!